


Are you struggling with making precise cuts for your woodworking projects? Tired of uneven angles and wasted materials due to inaccurate cuts?
A miter saw is a stationary power tool designed to make precise angled cuts by pulling a circular blade down onto the material. It excels at cross cuts, miter cuts, bevel cuts, and compound cuts, making it ideal for trim work, framing, and detailed woodworking projects.
Let’s explore the different types of miter saws, what they can do, and how to choose the right one for your needs. Whether you’re a DIY enthusiast or a professional tradesperson, understanding this versatile tool will help you achieve better results in less time.
Do you find yourself wasting time and materials trying to make accurate angle cuts with the wrong tools? A miter saw could be the solution you need.
A miter saw is an essential power tool that delivers precision cuts at various angles. Unlike a circular saw that pushes through material, a miter saw remains stationary while you pull the blade down, providing greater control and accuracy for woodworking and construction tasks.
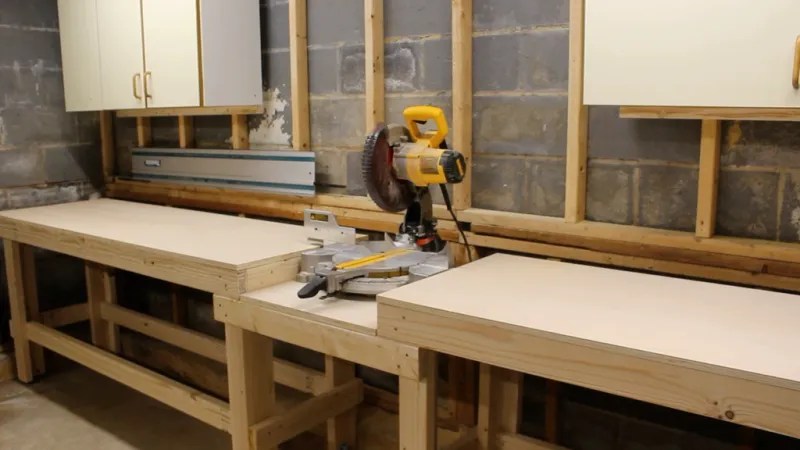
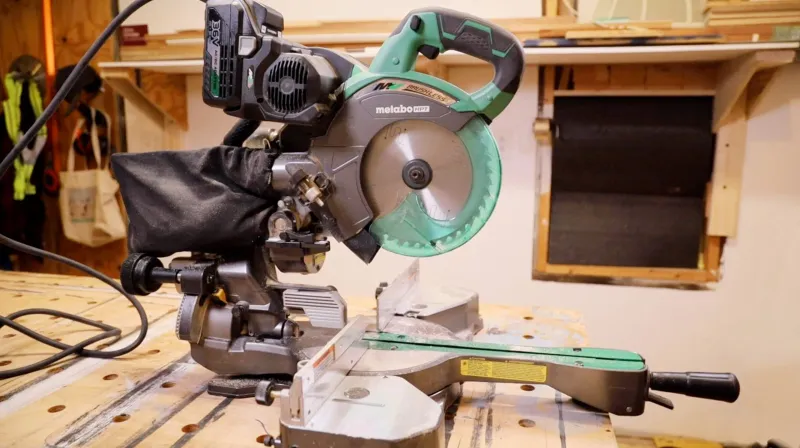
The miter saw has revolutionized how woodworkers and contractors approach cutting tasks. Its design focuses on precision and efficiency, allowing users to make consistent cuts without the guesswork. When you look at a miter saw, you’ll notice several key components that work together to create this precision.
The heart of any miter saw is its circular blade, typically ranging from 7¼ to 12 inches in diameter. This blade is mounted on an arm that pivots down to make cuts. The base of the saw, often called the table, provides a stable platform for your workpiece. Most miter saws also feature a fence, which helps align your material at a perfect 90-degree angle to the blade.
The miter gauge allows you to rotate the blade horizontally to make angled cuts across the face of the material. Many models also include positive stops at common angles like 15, 22.5, 30, and 45 degrees for quick setup. More advanced models include a bevel feature, which tilts the blade to cut angles through the thickness of the material.
Safety features are abundant on modern miter saws. These include blade guards that automatically retract when cutting, electric brakes that stop the blade quickly when you release the trigger, and dust collection ports to keep your workspace clean and your vision clear.
The power source for most miter saws is a corded electric motor, though cordless options have become increasingly popular for their portability. The motor’s power is measured in amps or volts, with higher numbers indicating more cutting power for tougher materials.
Understanding these components helps you appreciate how the miter saw achieves its remarkable precision and why it has become an indispensable tool for anyone working with wood.
Struggling to get the right angles for your picture frames or crown molding? Understanding the different cuts a miter saw can make will solve your problems.
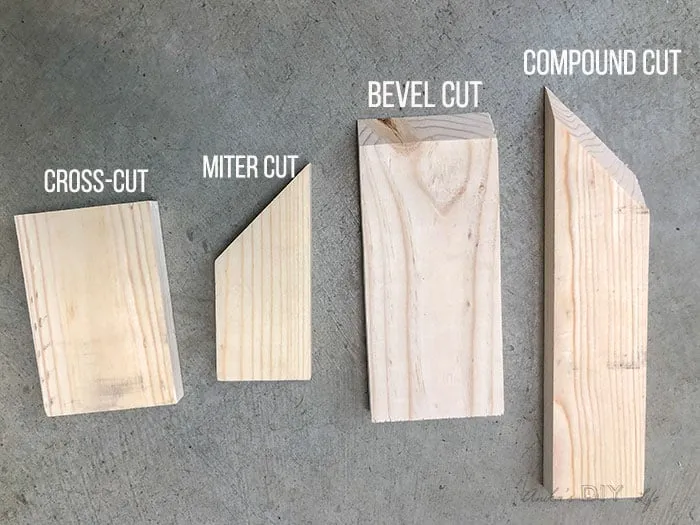
A miter saw can perform four main types of cuts: cross cuts (straight cuts across the grain), miter cuts (angled cuts across the face), bevel cuts (angled cuts through thickness), and compound cuts (combining miter and bevel angles). Each cut type serves specific purposes in woodworking and construction.
When working with a miter saw, knowing which cut to use for your specific project is crucial. Each cut type has its own technique and application, and mastering them will greatly expand what you can create.
Cross cuts are the most basic cuts you’ll make with a miter saw. These are straight, 90-degree cuts across the grain of the wood. While they may seem simple, achieving perfectly square cross cuts is essential for many projects. When two pieces don’t meet at exact right angles, gaps appear, weakening joints and creating visual flaws.
To make a perfect cross cut, place your material firmly against the fence, align your cut mark with the blade, and bring the saw down smoothly through the material. For longer pieces, use support stands to prevent sagging, which can cause binding or inaccurate cuts.
Miter cuts are angled cuts across the face of the wood. These are the cuts that give the miter saw its name. When you need to join two pieces at an angle—like for a picture frame or the corners of trim—miter cuts are essential.
To create a miter cut, adjust the saw’s miter gauge to your desired angle. For a typical 90-degree corner (like in a picture frame), you’ll set the miter at 45 degrees for each piece. Always test your angles on scrap pieces first, as even small inaccuracies can create gaps in your finished joints.
Bevel cuts angle through the thickness of the material rather than across its face. These cuts are useful for creating sloped edges, such as on table edges or when installing crown molding.
To make a bevel cut, you’ll tilt the saw blade to your desired angle while keeping the miter gauge at zero. This requires careful attention to safety, as the blade guard may not cover as much of the blade during these cuts. Always keep your hands well away from the cutting path.
Compound cuts combine both miter and bevel angles in a single cut. These are the most complex cuts but are essential for projects like crown molding, where materials meet at corners of walls and ceilings.
Setting up compound cuts requires careful measurement and often reference charts specific to your project. Many woodworkers create test pieces to verify their settings before cutting expensive materials. With practice, these cuts become more intuitive, opening up possibilities for more advanced woodworking projects.
Finding it hard to decide which miter saw fits your needs? The right type can make all the difference in your project’s success.
Miter saws come in four main types: single bevel (cuts bevels in one direction), double bevel (cuts bevels in both directions without flipping material), compound (makes simultaneous miter and bevel cuts), and sliding (extends blade reach for wider boards). Your choice depends on project complexity and material width.
Each type of miter saw offers specific advantages and limitations. Understanding these differences helps you select the right tool for your projects and budget.
The single bevel miter saw is often the most affordable option and a great starting point for beginners. As the name suggests, it can make bevel cuts in only one direction—typically to the left. This means that when you need to make matching bevel cuts in opposite directions, you’ll need to flip your workpiece.
This saw type is ideal for occasional DIY projects and simpler woodworking tasks. It handles cross cuts and miter cuts with ease, and the single bevel capability is sufficient for basic trim work and framing. The simplicity of these saws often means fewer parts that can go out of alignment, potentially offering more consistent cuts over time.
For homeowners who tackle projects a few times a year or beginners just starting in woodworking, the single bevel miter saw offers a good balance of capability and value.
The double bevel miter saw can tilt both left and right to make bevel cuts in either direction without flipping the workpiece. This feature saves significant time when cutting multiple pieces that need matching but opposite bevels, such as crown molding or roof rafters.
While typically more expensive than single bevel models, the time savings can be substantial on larger projects. The ability to make opposing bevels without repositioning the material also improves accuracy, as each piece is referenced from the same side of the fence.
Professional trim carpenters and serious DIYers who regularly work with crown molding or other projects requiring matching bevels will appreciate this feature the most.
Compound miter saws can create both miter and bevel cuts simultaneously. This capability is essential for projects with complex joinery, such as crown molding installation where walls meet at non-90-degree angles.
These saws come in both single and double bevel varieties. The compound cutting ability makes them versatile enough for most woodworking and carpentry tasks. They excel at trim work, framing, and any project requiring angled cuts in multiple planes.
The learning curve for compound cuts can be steeper, but the results are worth the effort for projects that require these complex angles.
The sliding miter saw features rails that allow the blade to move forward and backward, significantly increasing the cutting width capacity. While standard miter saws might be limited to cutting boards 6 inches wide, sliding models can often handle boards up to 12 inches or more.
This expanded capacity makes sliding miter saws ideal for cutting wide boards, panels, and lumber. The sliding mechanism adds complexity and cost to the saw but provides versatility that fixed-head models can’t match.
Cabinetmakers, furniture builders, and contractors who regularly work with wider materials benefit most from this type. However, the sliding mechanism requires more maintenance to ensure smooth, accurate operation over time.
| Miter Saw Type | Best For | Cutting Width | Price Range | Complexity |
|---|---|---|---|---|
| Single Bevel | Basic DIY, simple trim | 6″ typical | $ | Low |
| Double Bevel | Crown molding, time-sensitive projects | 6″ typical | $$ | Medium |
| Compound | Complex trim work, angled joinery | 6″ typical | $$ | Medium-High |
| Sliding | Wide boards, panels, lumber | 12″+ | $$$ | High |
Overwhelmed by all the miter saw options? Making the wrong choice could cost you money and limit your project capabilities.
When selecting a miter saw, focus on blade size (larger cuts wider material), power source (corded for continuous work, cordless for portability), cutting capacity (how wide it cuts), and accuracy features. Match these specifications to your typical projects rather than buying the most expensive option.
Selecting the right miter saw involves balancing several factors including your budget, the types of projects you’ll tackle, and the features that matter most to your work. Taking time to consider these elements will help you make a choice you won’t regret.
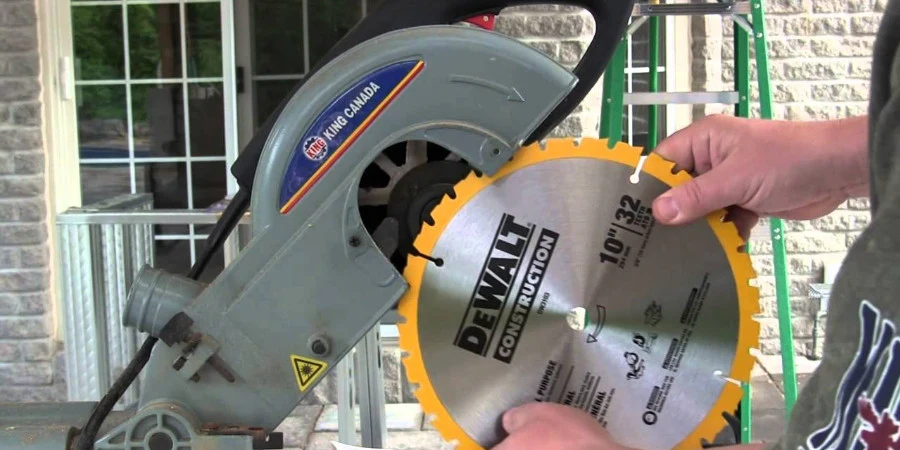
The blade size directly affects what your miter saw can cut. Common sizes include 7¼, 8½, 10, and 12 inches. Larger blades can cut wider and thicker materials but come with higher costs and require more power.
A 10-inch blade strikes a good balance for most users, cutting stock up to 6 inches wide at 90 degrees. If you regularly work with wider boards, consider a 12-inch model or a sliding saw. Remember that blade quality matters as much as size—a high-quality blade on a smaller saw often outperforms a poor-quality blade on a larger saw.
Replacement blades are another consideration. Larger blades cost more to replace, and specialty blades (like those for fine finishing or cutting non-wood materials) add to the long-term cost of ownership.
Traditionally, miter saws were corded tools, plugging into standard outlets to provide consistent power for demanding cuts. Corded models still offer the most reliable performance for extended use and cutting through thick or dense materials.
Recent advances in battery technology have made cordless miter saws increasingly practical. These offer the freedom to work anywhere without hunting for outlets or managing extension cords. Modern cordless saws can handle most cutting tasks, though battery life remains a limitation for all-day use.
Consider where you’ll use your saw most often. If you typically work in a shop with ready access to power, a corded model makes sense. If you move between job sites or work in areas without reliable power, the convenience of cordless might outweigh the need to manage batteries.
Beyond the basic blade size, consider the saw’s specific cutting capacities. Manufacturers list the maximum width and thickness a saw can cut at various angles. These specifications matter more than the general saw type when evaluating if a tool meets your needs.
Accuracy features are worth paying extra for. Look for saws with positive stops at common angles, which allow quick and precise setting of frequently used angles. A good fence system provides consistent support for your material. Laser guides or LED shadow lines can improve cut accuracy by clearly showing where the blade will contact the material.
The saw’s build quality affects accuracy over time. Heavier saws with robust components generally maintain their settings better than lighter, less expensive models. If precision is critical for your work, invest in a saw that will hold its calibration through years of use.
Dust collection capabilities vary widely between models. A saw that effectively captures dust will provide better visibility during cuts and create a healthier work environment. Look for models with dust ports that connect to shop vacuums or dust collection systems.
Comfort features like ergonomic handles and easy-to-reach controls make a significant difference during extended use. If possible, try handling different saws to find one that feels comfortable for your size and working style.
Table extensions support longer materials, reducing the need for separate stands. Some models include built-in work lights to illuminate the cutting area, especially helpful when working in dimly lit spaces.
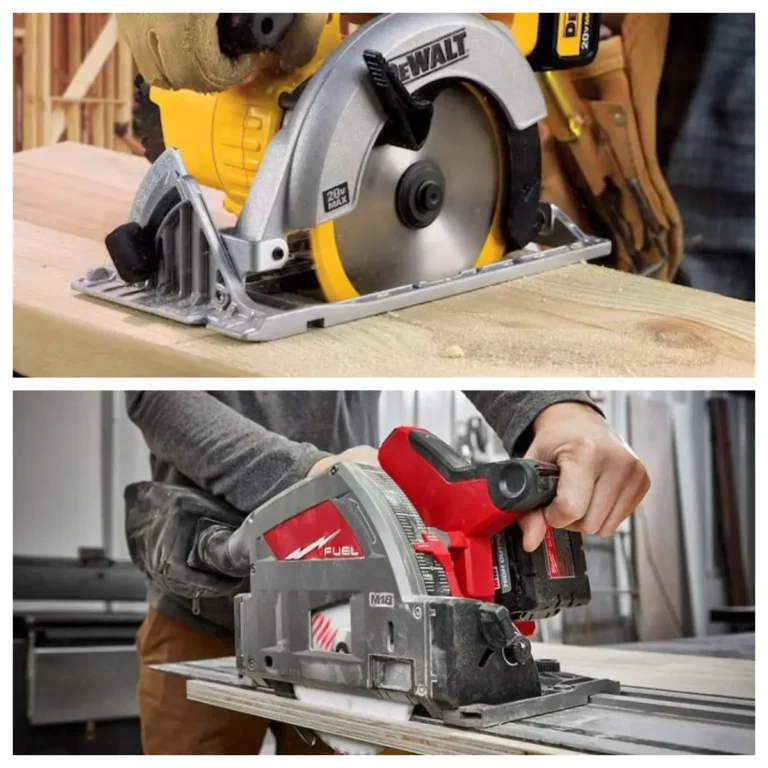
Confused about whether to buy a miter saw or circular saw first? Using the wrong saw for your projects can lead to frustration and poor results.
Miter saws excel at precise angle cuts on longer boards but remain stationary. Circular saws offer portability and versatility for various cuts, including ripping sheets of material. Miter saws provide better precision and safety for angled cuts, while circular saws cost less and handle a wider range of cutting tasks.

These two popular power saws serve different purposes, and understanding their strengths and limitations helps you choose the right tool for each job. Many woodworkers eventually own both, but if you’re starting out, knowing which to purchase first can save you money and frustration.
The miter saw’s greatest strength is its precision. By keeping the saw stationary and bringing the blade down onto the material, it creates consistent, accurate cuts. This design also makes it one of the safer power saws to operate, as your hands stay away from the blade path.
For projects involving trim work, framing, or any task requiring repeated cuts at the same angle, the miter saw is unmatched in efficiency. Once set up, you can make identical cuts quickly and confidently. The fence and miter gauge system ensures consistency across multiple pieces.
However, the miter saw has significant limitations. It can only cut materials that fit between the blade and fence—typically 6 inches for standard models or up to 12 inches for sliding models. It cannot make long rip cuts (cuts along the length of a board) or cut large sheet materials like plywood.
The stationary nature of the miter saw also means you bring materials to the saw rather than taking the saw to the materials. This can be challenging when working with very long pieces or in confined spaces.
The circular saw’s primary advantage is its versatility. As a handheld tool, it can make virtually any straight cut in wood materials. It excels at rip cuts and can handle sheet goods like plywood with ease when used with a straightedge guide.
Portability is another major benefit. You can take a circular saw anywhere, making it ideal for job sites or working on large pieces that can’t easily be moved to a stationary saw. Cordless models offer even greater mobility.
The trade-off comes in precision and ease of use. Making perfectly straight cuts with a circular saw requires skill and often additional jigs or guides. Angled cuts are possible but require careful setup and steady hands. The learning curve is steeper, and the potential for error is higher.
Safety considerations differ as well. While modern circular saws have excellent safety features, the exposed blade and handheld operation inherently carry more risk than the controlled cutting path of a miter saw.
If your projects primarily involve trim work, picture frames, molding, or other tasks requiring precise angle cuts on narrower materials, a miter saw will serve you better. It’s also the more approachable tool for beginners, with a shorter learning curve.
If you need to cut sheet goods, perform long rip cuts, or require maximum versatility from a single tool, the circular saw is the better choice. It’s typically less expensive than a miter saw, making it more accessible for those just starting to build their tool collection.
Many woodworkers find that a circular saw and a miter saw complement each other perfectly, with each excelling where the other falls short. If your budget allows, having both provides the most complete cutting capability for woodworking and construction projects.
| Task | Miter Saw | Circular Saw |
|---|---|---|
| Cutting picture frame miters | Excellent | Difficult |
| Installing crown molding | Excellent | Not practical |
| Cutting plywood sheets | Not possible | Excellent |
| Making rip cuts | Not possible | Excellent |
| Crosscutting 2x4s | Excellent | Good |
| Portability | Poor | Excellent |
| Precision angle cuts | Excellent | Fair |
| Learning curve | Gentle | Steeper |
| Price range | $$-$$$ | $-$$ |
A miter saw is a precision cutting tool that excels at angle cuts for trim, framing, and detailed woodworking. Choose the type that matches your project needs for better results and less wasted material.
When do you use a miter saw versus a table saw?
Use a miter saw for angled crosscuts and trim work. Use a table saw for rip cuts, sheet goods, and when precision along the length of boards is needed.
Does a woodworker really need a sliding-compound miter saw?
Only if you regularly cut wide boards over 6 inches. For basic woodworking and trim, a standard compound miter saw is often sufficient and more affordable.
How do I measure the angle on my compound miter saw?
Use the miter gauge markings on the saw base. For precise angles, test cuts on scrap wood and adjust as needed using a protractor or angle finder.
Do I need to lubricate my compound miter saw?
Yes, lubricate moving parts like the slide rails and pivot points regularly with manufacturer-recommended lubricant to maintain accuracy and smooth operation.
What kind of screw should I use with miter saw projects?
Use fine-thread screws for hardwoods and coarse-thread screws for softwoods. For trim work, finishing nails or brad nails often work better than screws.
Is it too much to ask for a miter saw with a detachable circular saw?
Yes, the designs serve different purposes with different safety mechanisms. Separate tools perform better than combination tools that compromise on both functions.
You might also consider a non-sliding miter saw if you are looking for a higher level of accuracy?
True, non-sliding miter saws often provide better accuracy due to less play in the mechanism. If you don’t need the extra cutting width, a fixed saw may give better results.