
Sanding by hand is exhausting and time-consuming. The right power sander can transform your DIY projects from tedious to enjoyable in minutes.
Choosing the right power sander depends on your specific project needs. Random orbit sanders are versatile for general woodworking, belt sanders excel at removing material quickly, and detail sanders are perfect for tight spaces and intricate work.
Let’s explore the different types of power sanders to help you make an informed decision for your next project. Whether you’re refinishing furniture, preparing surfaces for painting, or working on a woodworking project, understanding the strengths and limitations of each type will save you time and frustration.
Power sanders operate using different mechanical actions, each designed for specific tasks. Understanding these differences is crucial for selecting the right tool.
Power sanders use three main actions: rotary motion for aggressive material removal, random orbit for smooth finishing without swirl marks, and belt action for rapid stock removal on large surfaces.
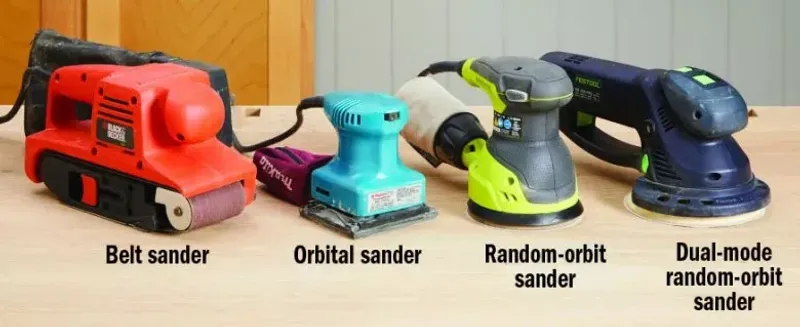
Power sanders can be grouped by the way they move the sandpaper against your work surface. Each type of motion has specific benefits and drawbacks that make it better suited for certain tasks.
Rotary sanders spin the sanding pad in a simple circular motion. This action is very aggressive and removes material quickly. A rotary sander works well for stripping paint and other finishes, especially in hard-to-reach areas like the crevices where boards overlap on wood siding.
However, rotary sanders require careful handling. The circular motion can leave swirl marks on your work surface if you’re not careful. These marks become especially visible after applying stain or finish. Rotary sanders are also more difficult to control than other types, making them better suited for experienced users.
You can turn an ordinary power drill into a rotary sander by attaching a sanding disc. This makes rotary sanding an affordable option if you already own a drill.
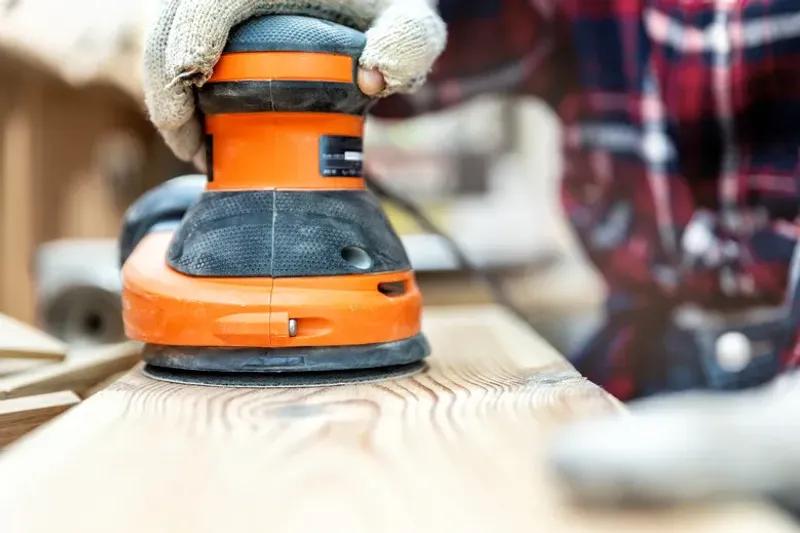
Random orbit sanders combine two movements: the pad spins in circles while also moving in small, irregular patterns. This dual action prevents the sander from leaving visible patterns on your work surface. The random motion creates a smoother finish than you can achieve with a purely rotary sander.
These sanders are easier to control than rotary or belt sanders because their action is more like vibration. They’re versatile enough for both removing material and creating a smooth finish, though they’re not as aggressive as belt sanders for heavy material removal.
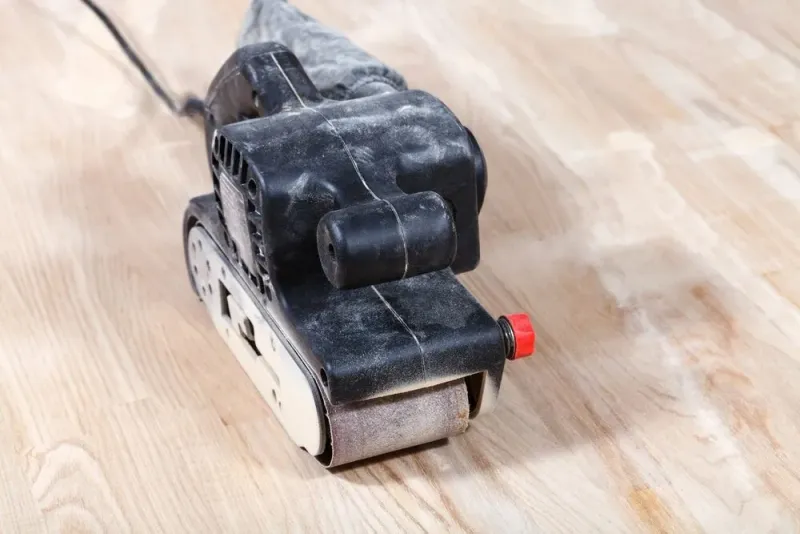
Belt sanders use a continuous loop of sandpaper that moves in one direction around powered wheels or drums. This linear motion is excellent for removing lots of material quickly, making belt sanders ideal for leveling surfaces and removing old finishes from large areas.
Belt sanders come in both handheld and stationary forms. Handheld belt sanders are portable and versatile, while stationary belt sanders provide more stability for precision work. Drum sanders, which are essentially large upright belt sanders, are specifically designed for refinishing hardwood floors.
The aggressive nature of belt sanders means they require skill and practice to use effectively. It’s easy to create gouges or uneven surfaces if you don’t keep the sander moving or if you tilt it during use.

Struggling with visible sanding marks ruining your finish? Random orbit sanders solve this common problem with their unique motion pattern.
Random orbit sanders combine circular spinning with small vibrations to prevent swirl marks, making them ideal for fine finishing work on wood surfaces while still removing material efficiently.
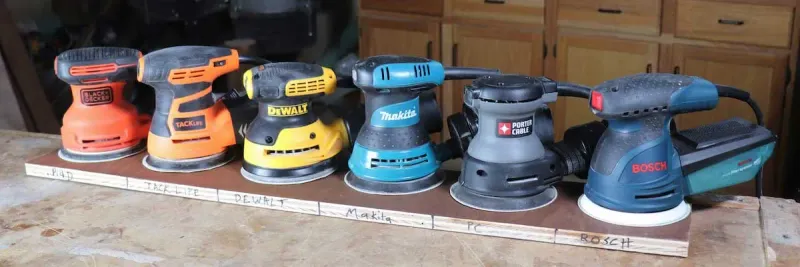
Random orbit sanders are the most popular choice for DIY homeowners, and for good reason. They offer the perfect balance between material removal and surface quality, making them versatile enough for most home projects.
Random orbit sanders excel at preparing wood surfaces for finishing. They’re ideal for:
The random orbital motion prevents the sandpaper from leaving visible patterns in your work, which is especially important when applying stains that would highlight any imperfections.
Random orbit sanders come in several sizes, with the most common being:
| Size | Description | Best For |
|---|---|---|
| 5-inch | Standard size, good balance of coverage and control | General purpose work |
| 6-inch | Larger pad covers more area quickly | Larger flat surfaces |
| 1/4-sheet | Square pad good for edges and corners | Detailed work and edges |
The 5-inch model is the most versatile and a great starting point if you’re buying your first sander. The larger 6-inch models remove material faster but can be slightly harder to control. Quarter-sheet models with square pads are useful for getting into corners.
When shopping for a random orbit sander, pay attention to these key features:
Random orbit sanders are relatively inexpensive, with good quality models starting around $50-75. For most DIY homeowners, a mid-range model ($75-100) offers the best balance of features, durability, and performance.
Remember that a random orbit sander isn’t designed for heavy material removal. If you need to remove a significant amount of wood or strip thick paint, you’ll want to start with a belt sander and then switch to the random orbit sander for finishing.
Need to remove a lot of material quickly? A belt sander’s aggressive action can save you hours of tedious work on large surfaces.
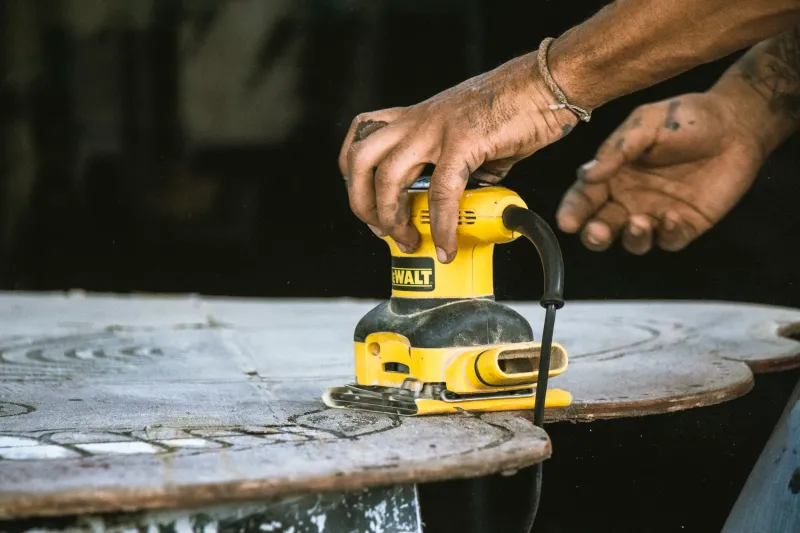
Belt sanders feature a continuous loop of sandpaper moving at high speed, perfect for rapid stock removal, leveling surfaces, and removing old finishes from large areas like floors and tabletops.
Belt sanders are powerful tools that can make short work of tough sanding jobs. Their aggressive nature makes them ideal for initial stages of refinishing projects, but they require skill and practice to use effectively.
A belt sander uses a continuous loop of sandpaper that rotates around two drums. The motor drives one drum while the other provides tension to keep the belt tight. This creates a linear sanding motion that removes material quickly and efficiently.
Belt sanders come in various sizes, identified by the dimensions of the sanding belt they use:
| Belt Size | Best For | User Level |
|---|---|---|
| 3 x 18 inch | General purpose, smaller projects | Beginners |
| 3 x 21 inch | Most home projects | Intermediate |
| 4 x 24 inch | Large surfaces, professional use | Advanced |
For most DIY users, a 3 x 18 inch or 3 x 21 inch model provides the best balance of power and control. Larger models remove material faster but are heavier and more difficult to manage.
Belt sanders excel at:
They’re particularly useful when you need to remove a significant amount of material or when working with large, flat surfaces like tabletops, doors, or cabinets.
Using a belt sander effectively requires proper technique to avoid damaging your work:
Belt sanders are powerful tools that require careful handling:
With proper technique and safety precautions, a belt sander can be an invaluable tool for tackling large sanding projects efficiently.
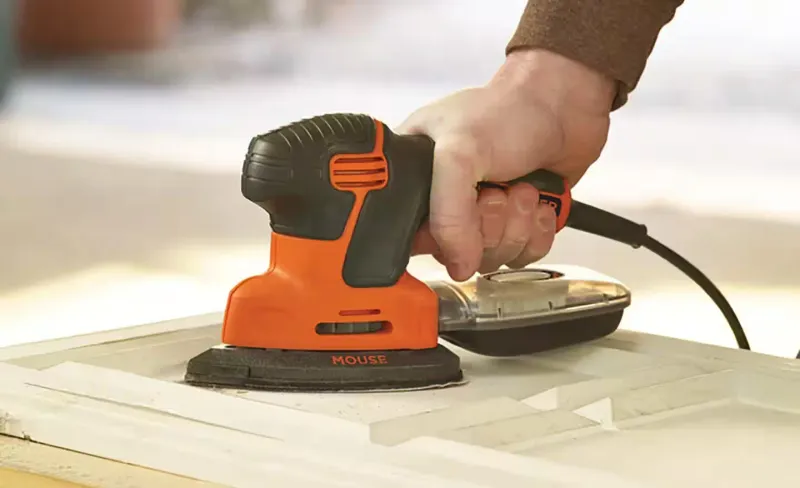
Corners and tight spaces often seem impossible to sand properly. Detail sanders are specifically designed to solve this frustrating problem.
Detail sanders, with their triangular pads and compact design, excel at reaching tight corners, edges, and intricate areas that larger sanders can’t access, making them essential for furniture restoration.
Detail sanders, also known as mouse sanders or corner sanders, are specialized tools designed for precision work in areas that would be difficult or impossible to reach with larger sanders. Their compact size and unique shape make them perfect for detailed work on furniture, crafts, and intricate woodworking projects.
The most distinctive feature of a detail sander is its triangular pad, which comes to a point that can reach into corners and tight spaces. Many models also include interchangeable pads of different shapes to handle various tasks. The design is often based on a computer mouse, making these sanders comfortable to hold and easy to control with one hand.
Detail sanders are typically:
Detail sanders shine in situations where precision is more important than power:
While detail sanders are excellent for specific tasks, they do have limitations:
To get the most from your detail sander:
For DIY beginners, a detail sander is often an excellent first power sander purchase. Its versatility, ease of use, and affordable price point (typically $30-75) make it accessible for those just starting with power tools. While it won’t replace larger sanders for big projects, it’s perfect for small jobs and can complement other sanders when working on complex pieces.
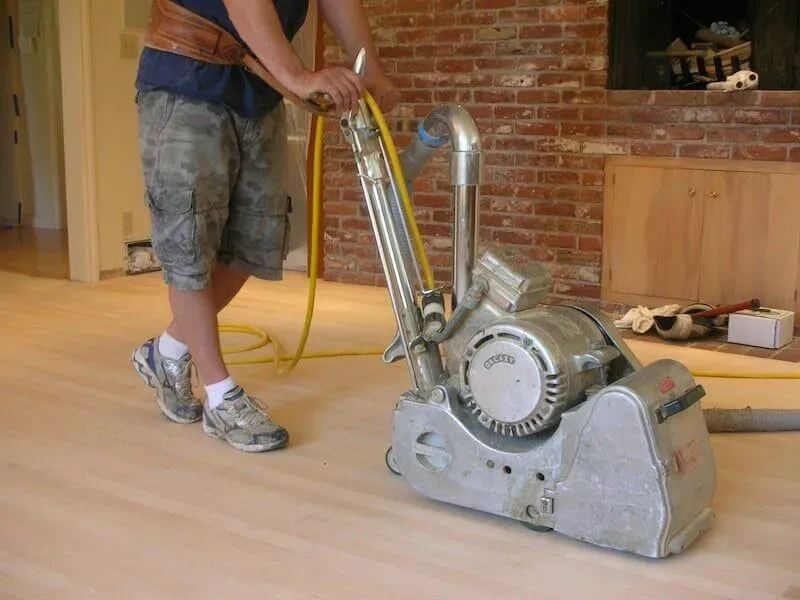
Refinishing hardwood floors can be intimidating. Drum sanders make this challenging task manageable, though they require careful handling.
Drum sanders are powerful floor refinishing tools that can quickly remove deep scratches, old finishes, and level uneven floors, but require skill to prevent gouging the surface.
Drum sanders are the largest and most aggressive type of power sander, designed specifically for refinishing hardwood floors. These powerful machines can transform worn, damaged flooring into a smooth, like-new surface, but they require respect and proper technique to avoid costly mistakes.
Unlike handheld sanders, a drum sander is a large, upright machine that resembles a lawn mower in operation. It features a rotating drum wrapped with a sanding belt that spins at high speed. The operator guides the machine across the floor using a handle, allowing the weight and power of the sander to remove material from the floor surface.
Most drum sanders available for rental use belts ranging from 8 to 12 inches wide, making them efficient for covering large areas. They’re designed exclusively for flat, horizontal surfaces—primarily hardwood floors.
Drum sanders are ideal for:
It’s important to note that drum sanders should only be used on solid wood flooring. They’re too aggressive for engineered wood floors with thin veneers, laminate flooring, or other non-wood surfaces.
Due to their size, cost, and specialized use, drum sanders are rarely worth purchasing for homeowners. Most people rent them from tool rental centers or home improvement stores when needed. Rental costs typically range from $50-100 per day, with discounts for weekend or weekly rentals.
When renting, you’ll also need to purchase sanding belts in various grits. Plan to start with coarse grit (24-36) for initial sanding, medium grit (50-60) for the second pass, and fine grit (80-100) for final smoothing.
Using a drum sander effectively requires specific techniques:
Before using a drum sander:
Remember that drum sanders are powerful machines that require two people to transport. Take your time to learn proper technique, and don’t hesitate to ask for a demonstration when renting.
With so many options available, selecting the right sander can be overwhelming. Your specific project needs should guide your decision.
Match your sander to your project: random orbit for general woodworking, belt sanders for heavy material removal, detail sanders for tight spaces, and drum sanders for floors.
Selecting the right power sander for your project can make the difference between frustration and satisfaction. The best choice depends on several factors, including the type of project, the material you’re working with, and your experience level.
Different projects call for different sanders. Here’s a quick guide to help you match your project with the most suitable sander:
| Project Type | Best Sander Choice | Alternative Option |
|---|---|---|
| Furniture refinishing | Random orbit sander | Detail sander for intricate parts |
| Hardwood floor refinishing | Drum sander | Edge sander for corners |
| Removing paint from large surfaces | Belt sander | Random orbit for finishing |
| Smoothing rough-cut lumber | Belt sander | Random orbit for final smoothing |
| Finishing cabinet doors | Random orbit sander | Palm sander |
| Sanding in tight corners | Detail/mouse sander | Multi-tool with sanding attachment |
| Preparing walls for painting | Drywall sander | Random orbit with fine grit |
| Smoothing curved surfaces | Detail sander | Hand sanding for final finish |
The material you’re working with also affects your sander choice:
Your experience with power tools should also influence your choice:
For those new to power sanders, start with:
As you gain experience, consider adding:
Experienced users might consider:
If budget is a concern, prioritize your purchases based on versatility:
Remember that the quality of your sander matters. A well-made mid-range sander will often outperform and outlast the cheapest high-end model. Look for reputable brands with good warranties and readily available replacement parts.
Not all sanders are created equal. Key features can make the difference between a frustrating experience and efficient, enjoyable work.
When purchasing a power sander, prioritize effective dust collection, variable speed control, ergonomic grip design, and appropriate power for your typical projects.
When shopping for a power sander, looking beyond the basic type and price can help you find a tool that will perform better and last longer. The right features can significantly improve your sanding experience, reduce fatigue, and deliver better results.
Sanding creates a lot of dust, which can be both a mess and a health hazard. Effective dust collection is one of the most important features to consider:
The effectiveness of dust collection varies widely between models. Reading reviews specifically about dust collection can help you identify sanders that excel in this area.
Variable speed control allows you to adjust the sander’s speed to match your task:
Entry-level sanders often run at a fixed speed, while mid-range and professional models offer variable speed control. This feature is particularly valuable if you work with different types of materials or tackle a variety of projects.
Since you’ll likely be using your sander for extended periods, comfort features are worth considering:
Sanders come in both corded and cordless varieties:
If you already own other cordless tools from a particular brand, staying within that same battery system can be economical.
Quality construction makes a significant difference in how long your sander will last:
While it can be tempting to save money on an entry-level sander, investing in a mid-range model with better features and construction often pays off in the long run through improved performance and longer service life.
Choosing the right power sander makes all the difference in your projects. Match the sander to your specific task, consider key features like dust collection and ergonomics, and remember that quality tools save time and frustration in the long run.
For furniture refinishing, a random orbit sander is ideal for most surfaces, while a detail sander helps with intricate areas and corners. Start with medium grit and progress to finer grits for a smooth finish.
Orbital sanders move in a fixed circular pattern which can leave swirl marks. Random orbital sanders combine circular motion with small vibrations, preventing visible patterns and creating a smoother finish.
Yes, but use a specialized drywall sander or a random orbit sander with fine grit and dust collection. Work at low speed to avoid gouging the surface and always wear a dust mask.
Random orbit sanders are best for beginners because they’re versatile, relatively inexpensive, and forgiving to use. They’re difficult to damage your work with and can handle most common household projects.
Start with coarser grits (40-80) for material removal, medium grits (100-150) for smoothing, and fine grits (180-220) for finishing. Always progress through grits sequentially, never skipping more than one grade.
Yes, dust collection is essential for health reasons and cleaner work. Choose sanders with good dust collection capabilities or ones that can connect to a shop vacuum for maximum effectiveness.
Always wear eye protection, a dust mask or respirator, and hearing protection. For larger sanders like belt or drum sanders, consider wearing gloves to reduce vibration exposure.